GHWT & Rock Band MIDI Filter for Drums
September 5, 2009 · File under Electronics
Mildly unsatisfied with my earlier, more obvious solution for using an electronic drum kit to play Guitar Hero World Tour (that is, just changing a few MIDI note settings), I've put together a solution I like better - a microcontroller which filters the MIDI signal between the drum kit sound module and the GHWT controller.
The advantages are these:
- The hi-hat pedal serves the proper function in the game, in that the pedal, rather than velocity, distinguishes an open from closed hi-hat hit.
- No need to mess with the MIDI settings of the drum sound module (so it's more portable & flexible, and less invasive).
- Cuter
The drum sound module (Roland TD-3 in my case) feeds into a MIDI IN circuit connected to an Arduino microcontroller, which adjusts the MIDI data appropriately, then sends it on to MIDI out, where the GHWT controller is connected. This "appropriate" adjustment to which I refer is just the remapping of certain MIDI note numbers so that, for example, the yellow pad can be triggered by both the edge and the bell of the hi-hat. In addition, the velocity of just hi-hat hits is replaced with a value based on the position of the hi-hat pedal. The details of the necessary mappings are evident in the code below or in yonder spreadsheet.
Three AAA batteries provide power (held together with electrical tape, with heavy oven pan foil providing the electrical connections - changing the batteries will be a bit inconvenient). I was hoping it could be powered just by drum sound module through the MIDI IN connector, but there doesn't seem to be enough current to power the circuit and the MIDI OUT. Or very possibly, I didn't sufficiently isolate the MIDI IN circuit from the rest of the circuit; but this goes beyond my electronics knowledge. However, I did use the MIDI IN power to toggle a relay to switch on the battery power, thus saving me the trouble of switching it on, and, worse, forgetting to switch it off. As long as it is plugged into a switched-on drum module, it's on. You just plug it in and forget it and that works beautifully.
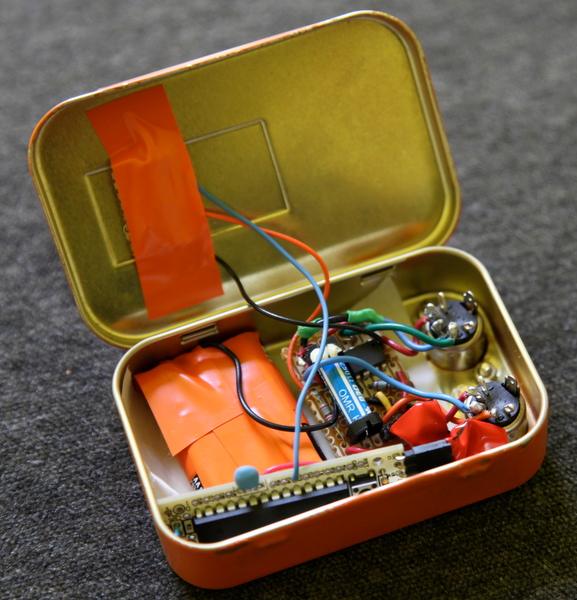
The Arduino clone I used is an RBBB from Modern Devices, which is small enough to fit. I power the Arduino directly on the +5V bus (albeit with only 4.5V); thus the power jack and voltage regular can be omitted and trimmed off the board. I also left a bunch of other stuff off - all that was needed were the two 0.1μF caps, the 10kΩ resistor, the resonator, the reset switch, the programming header, and the microcontroller chip (sans socket, to save room). This is connected to the other (MIDI, LED & relay) circuitry via the programming header (plus one wire to pin D3).
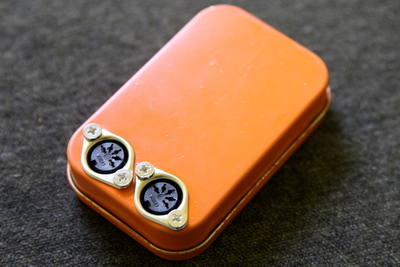
As is traditional with DIY electronics projects, it is housed, after some effort to miniaturize, in an Altoids tin. I did spray paint the tin orange for aesthetics. Also, it's actually a Hershey's Cacao Reserve tin, which is the same size, but doesn't have "Altoids" stamped into the top, and has better tasting contents. A slightly larger container would be better, since with this one the MIDI cords have to be awkwardly plugged into the bottom of the tin.
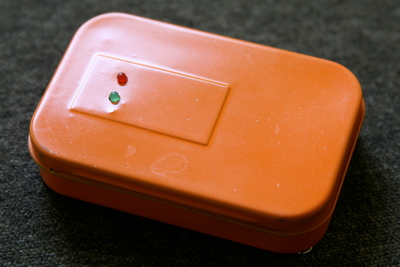
One LED shows that the board is powered up - I used a biggish 2.2kΩ resistor to dim it. Another LED indicates when note on/off messages are received, which is helpful for troubleshooting and looks cool. The brightness is proportional to the note velocity. One could add 6 LEDs in the appropriate colors to indicate notes on each controller pad, but I didn't.
Here is a schematic:
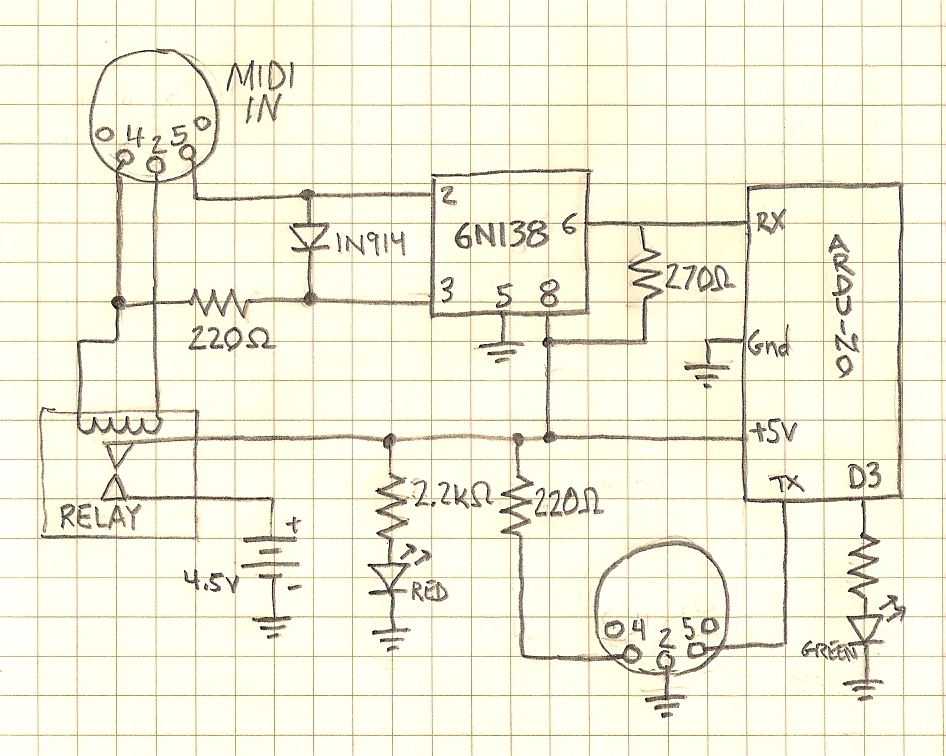
(the resistor I forgot to label off of D3 is 220Ω.)
And here's the Processing sketch (why in hell are they called "sketches" rather than programs?) that makes it all happen:
// Read MIDI messages from a TD-3 drum cotroller, modify them for use with GHWT,
// and pass them thru
//
// Hookups:
// - MIDI in circuit on pin RX/D0 (& +5V & Gnd)
// - MIDI out circuit on pin TX/D1 (& +5V & Gnd)
// - LED on pin 13 and/or 3
//
// GHWT MIDI note numbers
// kick 	36  purple
// snare 	38  red
// hi-hat 	46  yellow
// hi tom 	48  blue
// ride 	49  orange
// low tom 	45  green


void setup() {
  Serial.begin(31250);  // MIDI uses this odd serial rate
  pinMode(13, OUTPUT);
  digitalWrite(13, LOW);
  pinMode(3, OUTPUT);
  digitalWrite(3, LOW);
}


// MIDI messages received are decoded into these globals (which isn't kludgey;
// it's the right thing to do, I hereby declare)
int midiStatus = 0;           // most recent status byte
int midiMessageOffset = 999;  // offset from status byte
int midiChannel;              // channel given in status byte
int midiMessageType;          // message type given in status byte
int midiNote;                 // note number in most recent note on/off


// Hi-hat velocities are determined by the pedal being open or closed, since
// that's usually what this represents in the game (but if velocity is
// zero, leave it alone)
int SOFT = 63;   // Half strength
int HARD = 127;  // Full strength

void loop() {
  if (Serial.available()) {

    int midibyte = Serial.read();

    ++midiMessageOffset;

    if (midibyte >= 0x80) {
      // Status byte
      midiStatus = midibyte;
      midiMessageOffset = 0;
      midiNote = 0;
      midiMessageType = midiStatus >> 4;
      midiChannel = midiStatus & 0xF;
    }
    else if(midiStatus == 0x99 || midiStatus == 0x89) {
      // Percussion note-on or -off

      if (midiMessageOffset & 1) {
        // Note number
        midiNote = midibyte;
        switch (midibyte) {
        case 22:  // hi-hat clsd, edge
        case 26:  // hi-hat open, edge
        case 42:  // hi-hat clsd, bow
        case 52:  // crash 2 edge
        case 57:  // crash 2 bow
          midibyte = 46;
          break;
        case 40:  // snare rim
          midibyte = 38;
          break;
        case 41:  // tom 3
          midibyte = 45;
          break;
        case 51:  // ride bow
        case 53:  // ride edge
        case 55:  // crash 1 edge
          midibyte = 49;
          break;
        }
      }
      else {
        // Velocity
        if (midiMessageType == 0x9 && midibyte > 0) switch (midiNote) {
        case 22:  // hi-hat clsd, edge
        case 42:  // hi-hat clsd, bow
          midibyte = SOFT;
          break;
        case 26:  // hi-hat open, edge
        case 46:  // hi-hat open, bow
          midibyte = HARD;
          break;
        }
      }

    }

    Serial.write(midibyte);

    // Update an LED to show notes when we see the velocity byte
    if (((midiMessageOffset & 1) == 0) &&
        (midiMessageType == 0x9 || midiMessageType == 0x8)) {
      // Light up the traditional pin D13 to show activity
      digitalWrite(13, (midibyte == 0 ||
                        midiMessageType == 0x8) ? LOW : HIGH);
      // ...and use pin D3 to indicate velocity by brightness
      analogWrite(3, (midiMessageType == 0x8) ? 0 : midibyte * 2);
    }
  }
}
I'll mention that due to my poor soldering skills, plus the fact that I didn't realize I had poor soldering skills, made this sucker take me a long time to put together and debug. Once I got in there with a loupe, the problem was evident. "Problems", I should say.